Pre-requisites
To view the Portals tab in your library, you must have either the Manage Portals or View Portals permission enabled.
-
For more information, see Getting Started with Advanced Access Controls on Portals or contact your admin to request access.
If you have access, you’ll see the Portals tab in your navigation bar. Clicking it will take you to your list of available portals.
If your view looks like the image above, it means you do not have the necessary permissions—please reach out to your admin.
Portals List View: (End User View)
Once you open the Portals tab, you’ll land on the List View page. This page displays all portals you have access to, based on your permissions. From here, you can quickly find, open, or manage the portals available to you.
Portals List View: (Admin View)
Advanced Access Controls for Portals allow you to manage who can view or edit portals by assigning permissions to specific user groups. For steps on managing access, see Managing Portal Permissions.
The list view page is where you can see a full list of your organization’s portals, their names,
created date and status.
From this view, you can determine if a portal is published by its status.
- Live: Your portal is currently published and can be accessed by other users.
- Disabled: Your portal is still in draft mode and has not been published.
Actions Available to Admins in the Portals List:
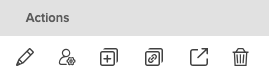
-
Edit – Update the portal’s name, description, layout, and other settings here.
-
Manage Access – Add or remove user groups and adjust viewing or editing permissions.
-
Copy Portal – Duplicate the portal, including its layout and settings, to create a new version.
-
Copy Link – Copy the direct URL to share the portal with permitted users.
-
Open in New Tab – Open the portal in a separate browser tab for easier multitasking.
-
Delete – Remove the portal from your library. Note: This action cannot be undone.