Pre-requisites:
- Please contact your Customer Success Manager to kick-off the Single-Sign-On enablement process.
- Identity Provider = Okta
- Protocol selected = SAML
The steps below describe the configuration to be completed to set up the custom MediaValet SAML application in Okta.
-
When logged into Okta, click on the Applications tab found on the left-hand pane and click on the "Browse App Catalog" button.
-
Search for the MediaValet application that supports SAML protocol:
- Click on the "+Add Integration" button and keep the default General Settings before clicking "Done"
Configure the MediaValet Custom Organization App Id
From the "Sign-On" tab, click on the "Edit" button and input the EntityId provided by MediaValet's Support team into the Organization App Id field and click Save to submit the changes.
Set up and Assign Users and Groups to the MediaValet Application
Both users and groups must be set up and assigned to the MediaValet application in Okta. This is needed to be sent as part of the SAML response from Okta to allow for users and groups to be mapped in MediaValet.
Step 1: Determining what users and groups need access to MediaValet
-
From the Sign On tab for the MediaValet application, scroll down to the groups field and select the appropriate option from the drop-down filter:
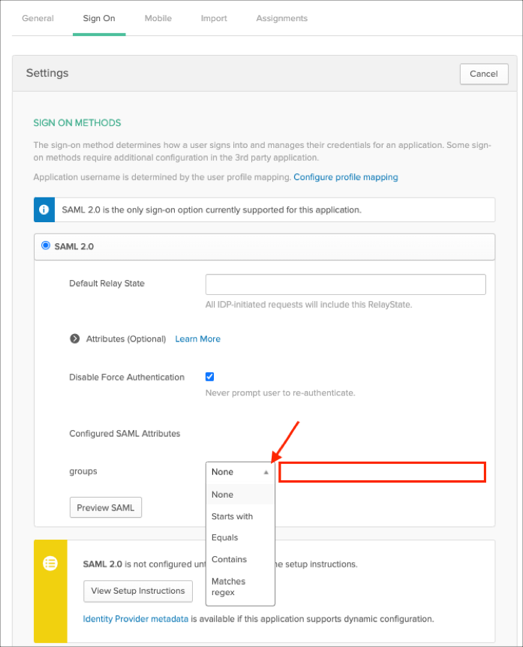
-
To send all groups a user is assigned to in Okta to MediaValet, select Regex and type .* (dot asterix) as shown below:

-
However, if you would like for only a select few user groups to be sent over, please either assign users to pre-existing group(s) set up in Okta or set up new custom user groups.
If setting up custom user groups, ensure the group names are pre-pended by MV as shown in the example below:
-
Following this, these custom groups can be targeted on the groups filter field on the MediaValet App by selecting "Starts With/Contains = MV"
-
Click Save to submit the changes.
-
Step 2: Assigning Users and Groups to the MediaValet app
- Once the groups have been targeted on the Sign-On tab, click on the Assignments tab
-
Next click on the blue Assign button and select the Assign to Groups option from the drop-down
-
From the page that appears, search for the groups you wish to have access to the application and click "Assign" next to each group as shown below:
-
Once you have completed assigning the relevant groups, click "Done"
- Complete the same steps for assigning any users that are not part of the groups that were assigned and should have acess to the application.
Provide the Okta Identity Provider Metadata
- From the Sign On tab, scroll down to the section titled Metadata details
- Copy the Metadata URL value and forward this in your response to the ticket opened with MediaValet's Support Team
Complete the SSO Form
-
MediaValet's Support team will provide you with a .docx form that will need to be completed.
-
In Section 1 - input the EntityId found in the Metadata URL created in the MediaValet Okta App and also provide the Metadata URL (not the XML file). Also indicate whether IdP login will need to be enabled (this allows for users to login from both Okta directly as well as from the MediaValet library login page)
-
In Section 3, if a custom application has been set up instead of the default MediaValet app in the Okta network, please indicate the claim/value pairs configured for the custom application. If using the default, leave this section blank.
-
In Section 4 - Authorization Rules, ensure the users that will be testing the SSO configuration are added to the following section:
Map the Okta groups to the MediaValet groups
- Go to the Authorization Rules Page in MediaValet under the Settings>Users page
- From the Authorization Rules page, a group claim will need to be added for each group assigned to the MediaValet SAML application in Okta.
- In the "Claim Name" field input "groups"
- In the second column, select "Equals"
- Under "RULE" column, input the relevant Okta Group name
- Choose Authorize As and choose the corresponding MediaValet Group from the dropdown (you can choose a default system group but we recommend to create your MediaValet groups with the correct permissions with the help of your Client Success Manager or Onboarding Manager)
Catch-all/Default rule
If you have new users who are part of your SSO tenant but haven't yet been added to a MediaValet group, we recommend setting up a default or "catch-all" group. This way, when users log in via SSO, instead of receiving an error stating they are not authorized, their accounts are automatically created and assigned to a default group with limited permissions (such as a Guest group, or any group you configure with your preferred permission set (we recommend to setup a default group with minimal permissions)).
NOTE:
You can setup different rules that are not based on the user group.
For example you could setup a rule on the email claim name:
email equals "john.doe@company.com" Authorize as Administrator (meaning John Doe will receive Administrator permissions)
email contains "@company.com" Authorize As "Guest" (meaning the people logging with a certain email domain will automatically receive Guest permissions.